+86-18058825678
- All
- Product Name
- Product Keyword
- Product Model
- Product Summary
- Product Description
- Multi Field Search

- Home
- Our Product
- About Didtek
- Solutions
- Exhibition Show
- Support
- News
 English

Views: 0 Author: Site Editor Publish Time: 2026-05-15 Origin: Site


You can install a chain wheel gate valve by following easy steps. First, get the right tools and prepare the system. Next, attach the chain wheel and make sure it is tight. Then, adjust the valve and test it to see if it works. DIDTEK’s Cast Steel Gate Valve With Chain Wheel Driven is strong and works well. It makes your job easier and safer. Safety is very important. Always wear protective gear and use tools carefully. Even if you only know basic mechanics, you can finish the installation with confidence.
Feature | Benefit |
|---|---|
High-quality construction | Makes the valve strong and reliable for factories. |
Designed for optimal performance | Helps the valve work well in many places. |
Rising stem option | Lets you check the valve’s position easily. |
Pressure seal capability | Works for high-pressure systems and keeps things safe and efficient. |
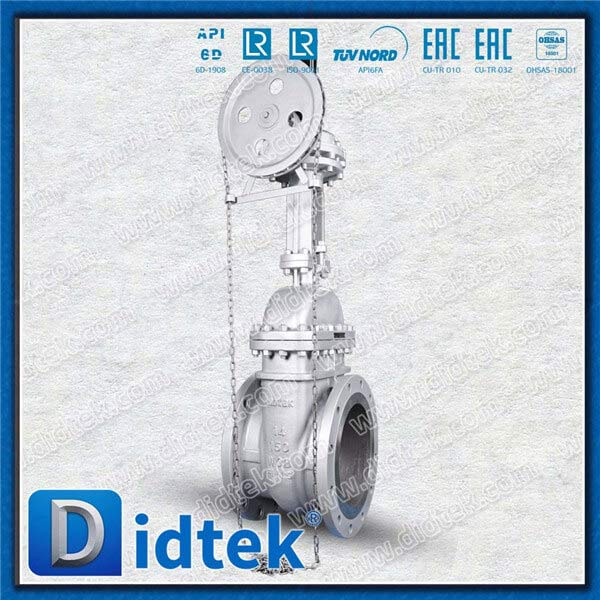
Before you start installing a chain wheel gate valve, you need to gather the right tools and materials. Having everything ready helps you work faster and safer. You also avoid mistakes when you use the correct equipment. DIDTEK recommends using high-quality accessories to match their Cast Steel Gate Valve With Chain Wheel Driven.
You should collect these tools before you begin:
Wrenches (adjustable and fixed sizes)
Screwdrivers (flathead and Phillips)
Pipe wrench
Torque wrench
Measuring tape
Level
Hammer or mallet
Slotted bolts and nuts
U straps or chain wheel mounting brackets
Pipe supports or lifting device (for heavy valves)
Safety gloves and goggles
You will use these tools to inspect the valve, align it with the pipeline, and secure it in place. You also need them to attach the chain wheel and tighten all fasteners. A torque wrench helps you apply the right force so you do not damage the valve.
You also need some materials to finish the job:
Chain wheel kit (includes chain, wheel, and mounting hardware)
DIDTEK Cast Steel Gate Valve With Chain Wheel Driven
Gaskets for sealing connections
Pipe fittings (as required for your system)
Lubricant for bolts and moving parts
Cleaning cloths or rags
You should check that the valve matches your system size and pressure rating. Make sure you have all the parts from the chain wheel kit. Using the right materials helps you get a tight seal and smooth operation. If you use DIDTEK’s recommended accessories, you can trust that everything will fit well and last a long time.
Tip: Lay out all your tools and materials before you start. This makes the installation of your chain wheel gate valve much easier and helps you avoid delays.
You need to protect yourself before you start working. Wear safety gloves to keep your hands safe from sharp edges. Put on goggles to shield your eyes from dust and debris. Use a hard hat if you work in an area where objects might fall. Steel-toed boots help protect your feet from heavy items. Make sure your clothing fits well and does not get caught in moving parts. You should always check your gear before you begin.
You must prepare the system before installing the chain wheel gate valve. Shut off the main supply and lock out the system to prevent accidental flow. Drain any fluid from the pipes so you do not face leaks or spills. Clean the area around the installation site. Remove any dirt or old gasket material. Check the pipeline for damage or corrosion. Make sure the valve matches the size and pressure rating of your system. Lay out all tools and materials so you can reach them easily.
Tip: Double-check the specifications of your valve and system. This helps you avoid application mismatch and assembly errors.
You need to handle the valve with care. Use lifting devices or pipe supports for heavy valves. Ask for help if the valve is too heavy to lift alone. Hold the valve steady while you attach it to the pipeline. Tighten bolts and nuts with the correct tools. Do not use too much force. Apply torque as recommended by the manufacturer. This prevents damage and ensures a tight seal.
Common Safety Incidents | Causes |
|---|---|
Application mismatch | Inadequate specification of requirements |
Insufficient lifetime torque | Lack of proper torque matching |
Assembly errors | Errors during the assembly process |
You can prevent most incidents by following these steps. Always check the requirements and use the right tools. Take your time and pay attention to each step.
You start by checking the valve for any damage. Make sure the valve matches your system’s size and pressure needs. Look at the installation site and choose a spot that is easy to reach for future maintenance. Clean the area around the pipeline. Remove dirt, old gasket material, and anything that could fall into the valve. You prevent leaks and problems by keeping the area clean.
Inspect the pipeline for corrosion or cracks. Align the valve with the pipeline so you avoid stress and leaks. Use a measuring tape and level to check alignment. Gather all tools and materials, including slotted bolts, U straps, and the chain wheel kit. Lay everything out so you can work smoothly.
Tip: Always check the installation depth of the valve seat with special tools. This helps you avoid leaks caused by incorrect seat placement.
You attach the chain wheel to the valve stem or handwheel. Use the mounting brackets or U straps from your chain wheel kit. Place the chain wheel so it hangs straight and does not twist. Insert slotted bolts through the brackets and tighten the nuts. Make sure the chain wheel sits firmly and does not wobble.
If your valve is heavy, use a lifting device to hold it steady while you work. Check that the chain passes through the tubing and hangs at the right length. Attach labels to the tubing so you can see them at the bottom of the chain loop. These labels help you know which way to pull for opening or closing.
Common Mistakes | Preventive Measures |
|---|---|
Dropping foreign objects into the valve | Clean the area before installation to prevent leakage due to improper closure. |
Incorrect installation of the valve seat | Use special tools to ensure correct installation depth to avoid leakage. |
Inflexible hand wheel rotation | Control force during operation, ensure proper lubrication, and maintain cleanliness to prevent operational issues. |
You adjust the chain wheel so it lines up with the valve stem. Make sure the chain moves smoothly and does not catch on anything. Tighten all bolts and nuts with a torque wrench. Follow the manufacturer’s instructions for the right torque. This keeps the valve secure and prevents leaks.
Check that the chain wheel turns easily. Lubricate moving parts if needed. Place tags and labels in visible spots, but never on the valve handle or wheel. Attach labels to the valve yoke so they do not interfere with operation. If you cannot see the valve from the operating location, use labels to show the open and close directions.
Note: Proper alignment and secure mounting help you avoid leaks and make the valve easier to operate.
You test the chain wheel gate valve to make sure it works. Pressurize the system and close the valve fully. Watch the downstream side for any pressure rise or visible leaks. Use a vent or drain to check for leaks. Repeat the test by reversing the pressure and checking both sides of the valve.
Follow these steps for testing:
Test Setup: Pressurize the system and close the gate valve.
Checking for Leakage: Monitor for pressure changes or visible leaks.
Testing Both Seats: Reverse the pressure and repeat the test.
Check that the chain wheel operates smoothly. Make sure the valve opens and closes without sticking. Record your installation and test results. Keep labels and tags in place for safe operation. You help future maintenance by keeping good records.
Attach labels for chain operators to tubing at the bottom of the chain loop.
Use tags to show open and close directions if the valve is not visible.
Place labels in visible spots, not on handles or wheels.
Attach labels permanently to the valve yoke.
Tip: Good documentation helps you track maintenance and ensures safe operation.
You finish the installation by making sure everything is tight, clean, and easy to use. The chain wheel gate valve from DIDTEK gives you reliable performance and easy operation when you follow these steps.
You may face some common problems when you use a chain wheel gate valve. These issues can affect how well your valve works. The table below shows the most frequent problems, what causes them, and how you can fix them:
Issue | Problem Description | Solution Description |
|---|---|---|
Leakage | Wear and tear or poor installation can cause leaks. | Check seals, replace damaged parts, and tighten connections. |
Sticking or Jamming | Debris, rust, or not enough oil can make the valve hard to move. | Lubricate often and remove any blockages. |
Corrosion | Rust can damage valve parts and cause leaks. | Use valves with protective coatings and check for rust often. |
Erosion | Fast-moving fluids can wear down parts and cause leaks. | Control fluid speed and use strong materials. |
Difficulty in Operation | Poor care or tough conditions can make the valve hard to turn. | Do regular maintenance and think about using an actuator. |
Seat and Seal Damage | Friction and wear can harm seals and cause leaks. | Inspect and replace seals as needed. |
Cavitation | Big pressure changes can damage valve parts. | Control pressure and use special trims if needed. |
Water Hammer | Closing the valve too fast can damage the system. | Close the valve slowly and use water hammer arrestors. |
Improper Installation | Wrong installation can cause many problems. | Follow the steps in the manual and check alignment. |
Tip: If you notice leaks or the valve feels hard to turn, stop and check for these issues right away.
You can keep your chain wheel gate valve working well by following a few simple steps:
Inspect the valve and chain wheel every month. Look for signs of rust, leaks, or loose parts.
Lubricate moving parts to keep the valve easy to operate.
Clean the chain and wheel to remove dust and debris.
Tighten bolts and nuts if you find any that are loose.
Replace worn seals or gaskets as soon as you see damage.
Record all maintenance in a logbook. This helps you track problems and plan future checks.
Note: DIDTEK valves come with a guarantee, but regular care helps them last even longer.
If you follow these tips, you will keep your valve safe and reliable for years.
You can put in a chain wheel gate valve by following simple steps. Always pick the right tools and follow safety tips. DIDTEK’s Cast Steel Gate Valve With Chain Wheel Driven lasts a long time and is easy to take care of. You can see how long the valve works in different places:
Operating Conditions | Average Service Life |
|---|---|
Moderate conditions (e.g., clean water) | 10–15 years |
Controlled environments (e.g., oil refineries) | 15–25+ years |
Harsh conditions (poor maintenance) | 3–5 years |
You also get a good warranty:
| Valve Guarantee | 18 months after shipments and 12 months after installed |
Check your valve often to make sure it works well. This helps you feel sure about your valve.
Check the valve size and pressure rating. Compare these with your pipeline specifications. DIDTEK valves offer many sizes and ratings. You can find details in the product manual.
You can install the valve if you have basic mechanical skills. Use the right tools and follow safety steps. Ask for help with heavy valves.
Inspect and lubricate the valve every month. Clean the chain wheel and check for leaks. Replace worn parts as soon as you notice damage.
Stop using the valve. Check seals and connections. Tighten bolts. Replace damaged gaskets or seals. If the leak continues, contact DIDTEK for support.


