+86-18058825678
- All
- Product Name
- Product Keyword
- Product Model
- Product Summary
- Product Description
- Multi Field Search

- Home
- Our Product
- About Didtek
- Solutions
- Exhibition Show
- Support
- News
 English

Views: 0 Author: Site Editor Publish Time: 2025-08-11 Origin: Site


Many people ask, "What is the difference between a part 1 and part 2 float valve?" The key difference lies in where the water is released. Part 1 float valves discharge water from the bottom, while part 2 float valves release water from the top. This distinction is important when installing them in 6-inch or 8-inch tanks. Plumbers choose float valves based on regulations to ensure water safety. Understanding what is the difference between a part 1 and part 2 float valve helps you select the right valve for a 10-inch or 12-inch cistern.
Choosing the correct float valve ensures proper water flow and compliance with standards.
Part 1 float valves let water out from the bottom. Part 2 float valves let water out from the top. Part 1 valves are good for small tanks, like 6-inch or 8-inch ones. Part 2 valves are better for big tanks, like 10-inch or 12-inch ones. Part 2 valves also follow new safety rules. Part 2 float valves stop water from going backward better. This keeps water clean and follows plumbing rules. To change Part 1 valves, you bend a metal rod. Part 2 valves use a screw, so it is easier to set the water level. Stainless steel float valves last longer and do not rust. They are best for big tanks and hard places. You need to install float valves the right way. Clean and oil them often to keep them working well and stop leaks. Pick the right valve size and type for your tank and water pressure. This helps stop problems like overflow and backflow. Certified float valves with air gaps keep water safe and meet safety rules. This helps you feel safe.
When you look at what is the difference between a part 1 and part 2 float valve, you notice a few main things. The outlet location, water flow direction, and how you adjust them are not the same. These design changes affect how you put them in, fix them, and control water levels in tanks from 6-inch to 12-inch.
Part 1 float valves have an outlet on the bottom of the valve. This means water comes out straight down into the tank. People often use these in older 8-inch or 10-inch cisterns. The bottom outlet can help if there is not much space above the valve. But, if you do not install it right, it might cause backflow.
Part 2 float valves let water out from the top. The top outlet sends water above the water line. This helps stop dirty water from getting in and meets new plumbing rules. Plumbers like this type for 10-inch and 12-inch tanks, especially when rules say you need to stop backflow. The top outlet also lets you see the water flow and makes it easy to adjust the valve.
Water flow direction is important for filling the tank and stopping overflow. In float valves, where the water goes in changes how fast and safe the tank fills. If the refill tube goes too far into the overflow pipe, it can make a siphon. This can empty the tank by mistake and cause overflow. Putting the refill tube in the right spot makes sure water drips in without making a siphon. This keeps the water level right and stops the tank from draining by accident. The way water flows in Part 1 and Part 2 valves changes how well they control water levels and stop overflow.
How you adjust the valve and what it is made of are also different. The table below shows the main ways you adjust each type:
Float Valve Type | Adjustment Mechanism Description | Key Difference from Other Types |
|---|---|---|
Part 1: Metal Ballcock | Adjusted by bending the metal float rod up or down to change water level. | Mechanical bending of float arm required. |
Part 2: Plastic Ballcock | Adjusted by turning an adjustment screw on top to raise or lower the float. | Uses a screw; float rod is plastic and cannot bend. |
Part 1 valves use metal rods. You have to bend the rod to set the water level. This can be hard, especially in small 6-inch or 8-inch tanks. Part 2 valves use a plastic float and a screw to adjust the water level. This makes it easier to set the level in 10-inch or 12-inch tanks without bending anything.
What the valve is made of also matters for how long it lasts. Stainless steel parts, like SS304 or SS316, do not rust and last longer. They are good for tough or high-pressure places. Some float valves use brass or coated alloys for special jobs, but stainless steel works best for a long time. Picking the right material makes sure the valve works well and does not need to be replaced often.
Tip: Always look at what the float valve is made of before you buy one. Stainless steel valves last longer and work better in tough spots.
Common problems when putting in both types are:
The float arm is not set right, so you may need to bend it or turn a screw
Leaks from the valve or fill valve
Old or stuck parts are hard to take out, especially in old ballcock types
Washers inside the valve wear out, so you may need to replace the whole valve
These problems can make toilets run, cause low water, or leaks. New float-cup style valves help stop these issues. But knowing the main differences in how you adjust and build the valves helps you pick the best one for your tank size and needs.
Understanding what is the difference between a part 1 and part 2 float valve? starts with how each type operates inside a tank. Both float valves control the water level, but their mechanisms differ.
Part 1 float valves use a simple, gravity-based system. The process works as follows:
Water enters the 6-inch or 8-inch tank from the top inlet.
As the tank empties, the weighted float drops down along a nylon cord until it hits the bottom stop.
When the float reaches the bottom, the valve opens fully, letting water flow in at maximum speed.
The rising water causes the float to lift.
Once the float reaches the upper stop, it pushes the arm up and shuts off the valve.
Part 2 float valves offer a more refined adjustment process, especially in 10-inch or 12-inch tanks:
Remove the plastic cover to access the top of the valve.
Ensure the supply hose connects to the female inlet.
Check that the upper float stop sits just below the float arm.
The bottom weight should rest about one inch above the tank’s base.
If the weight touches the bottom, shorten the nylon cord by tying a knot, raising the float for better clearance.
This step-by-step operation shows how each valve type manages the water level differently. Part 1 relies on a weighted float and gravity, while Part 2 uses precise adjustments for better control.
Tip: For tanks from 2-inch to 12-inch, always check the float’s position after installation. Proper setup prevents overflow and keeps the system efficient.
Each valve type brings unique features that impact performance and compliance.
Part 1 float valves have a bottom outlet. This design works well in older 6-inch or 8-inch tanks with limited space above the valve. The metal float arm allows manual adjustment by bending, but this can be tricky in tight spots.
Part 2 float valves feature a top outlet. This design prevents backflow and meets modern plumbing codes. The plastic float arm adjusts with a screw, making it easier to set the water level in 10-inch or 12-inch tanks.
A quick comparison:
Feature | Part 1 Float Valve | Part 2 Float Valve |
|---|---|---|
Outlet Location | Underside (bottom) | Top |
Adjustment | Bend metal rod | Turn adjustment screw |
Backflow Prevention | Less effective | Highly effective |
Typical Tank Size | 6/8/10 inch | 10/12 inch |
Choosing the right valve ensures safe, reliable operation. Homeowners and plumbers who understand what is the difference between a part 1 and part 2 float valve? can select the best option for any tank size. The right choice protects water quality and keeps maintenance simple.

A part 1 float valve is a good choice for many jobs. Homeowners and building managers like it because it is simple and not expensive. People use this valve to keep water at the right level in tanks. It helps stop tanks from overflowing in homes and businesses. The part 1 float valve works best in water tanks that are 6-inch, 8-inch, or 10-inch. It also fits well in irrigation systems and places where animals drink water. Cooling towers use it too.
Common ways to use it are:
Water tanks to keep water steady
Irrigation systems for a steady water supply
Livestock watering so animals always have water
Cooling towers to keep water at the right level
Pools, boilers, and drilling jobs where water control matters
Many people pick the part 1 float valve for old tanks or when there is not much space above the tank. Its outlet is on the bottom, so it is easy to put in 6-inch or 8-inch tanks. You can also find this valve in some 2-inch or 4-inch tanks. This makes it useful for many tank sizes.
Note: The part 1 float valve works by itself to keep liquid levels right. It helps stop overflow and keeps water steady in many systems.
Every product has good and bad points. The part 1 float valve is simple and cheap, but it has some limits. The table below shows the main good and bad things:
Aspect | Details |
|---|---|
Advantages | - Low flow resistance |
Disadvantages | - Pressure and ball weight can push on the seal |
Usage Limits | - PN ≤ 2.5MPA (150lb), DN ≤ 200mm (8") |
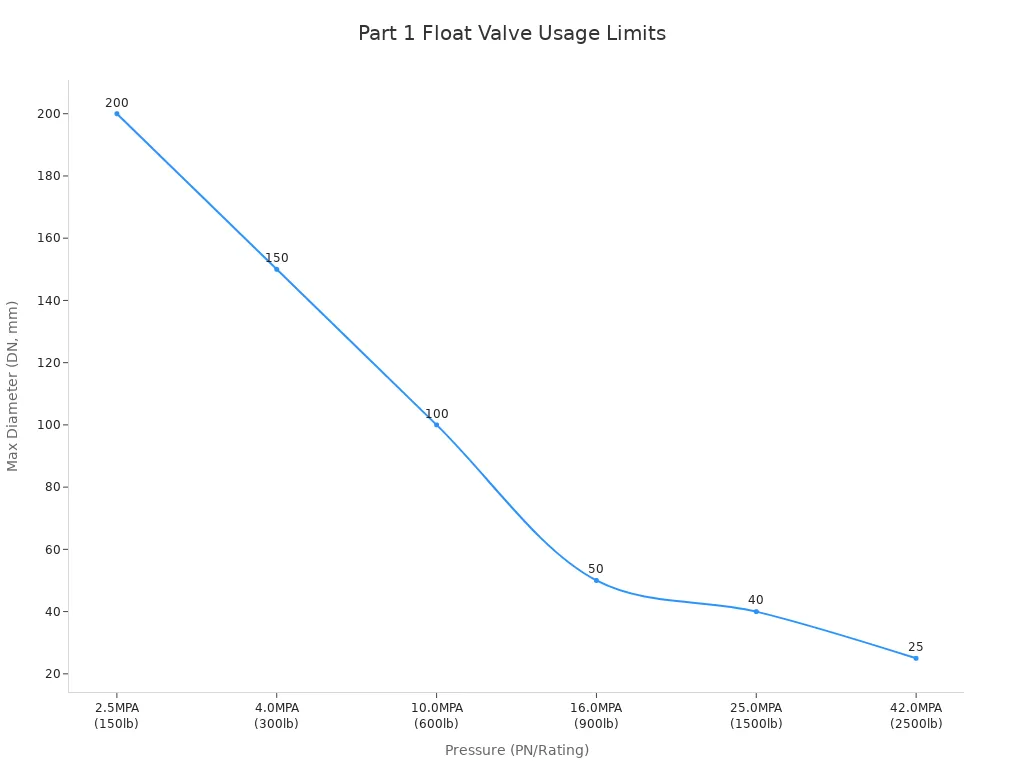
The part 1 float valve seals well and lets water flow easily. It is a smart pick for 6-inch or 8-inch tanks with normal pressure. But it is not good for high pressure or big 10-inch or 12-inch tanks. The seal can change shape if there is too much weight. Friction can make it harder to move and cause wear. For tanks bigger than 8-inch or with high pressure, try a different float valve for better results.
Tip: Always check your tank size and pressure before picking a part 1 float valve. For most 2-inch to 8-inch tanks, this valve gives good and low-cost water control.
A part 2 float valve is a top pick for new water systems. Plumbers like it because it works well and follows safety rules. Homeowners and managers use it to keep water at the right level and stop dirty water from getting in. The top outlet makes it great for tanks where stopping backflow is important.
People put part 2 float valves in many places. They work in home water tanks, especially 10-inch or 12-inch ones. Big buildings use them in large tanks to keep water steady. Factories use part 2 float valves for 8-inch, 10-inch, or 12-inch tanks. Farmers use them for watering crops and animals, where water levels must stay the same. Fire systems often have part 2 float valves to make sure they are ready. Huge water storage places also use them because they work well.
Residential water storage tanks (6-inch, 8-inch, 10-inch, 12-inch)
Commercial water storage tanks
Industrial water storage tanks
Irrigation systems
Livestock watering systems
Fire protection systems
Large-scale water storage facilities
A part 2 float valve helps keep water at the right level, stops overflow, and keeps water clean. Managers like that you can adjust it easily for different tank sizes. The design helps follow plumbing rules, so it is a smart choice for new tanks.
Tip: For any tank from 2-inch to 12-inch, a part 2 float valve gives you peace of mind and works well for a long time.
Picking a part 2 float valve has many good points. The top outlet stops dirty water from going back into the supply. This keeps water safe and follows plumbing rules. The screw lets you set the water level just right, which saves time when putting it in or fixing it. The plastic parts do not rust, so the valve lasts longer even in tough places.
Managers and plumbers often talk about these good things:
Aspect | Details |
|---|---|
Advantages | - Great at stopping backflow |
Disadvantages | - Costs more than part 1 float valves |
A part 2 float valve costs more than a part 1, but most people think it is worth it. The design may not work for very old or very small tanks, like 2-inch or 4-inch ones. Some people say the plastic parts can wear out, but if you check and fix it often, it will last longer.
Managers who want safe and easy water control should pick a part 2 float valve. Its features help follow rules, keep water safe, and make changes simple. For tanks that are 6-inch, 8-inch, 10-inch, or 12-inch, this valve works well and is reliable.
Note: Buying a part 2 float valve helps your water system stay safe and work well for many years.
Float valves play a key role in keeping water systems safe. In the UK, strict rules protect drinking water from risks. The Water Supply (Water Fittings) Regulations 1999 set the standard. These rules require all float valves, whether used in a 2-inch, 4-inch, or even a 12-inch tank, to meet high safety and quality standards. Every valve must pass tests that prove it can stop water from flowing backward. This helps keep water clean in homes, schools, and businesses.
Manufacturers must show their products meet these rules. They can use one of three trusted certification schemes: WRAS, Kiwa UK Regulation 4 (KUKreg4), or NSFreg4. Each scheme checks that the float valve meets the same tough standards. Since 2019, WRAS has required float valves to include an air gap to pass the antisiphonage test. This change makes sure even traditional valves work safely in all situations. The law does not force companies to use only WRAS. Any of the three certifications proves the valve is safe and legal.
In the US, similar standards apply. Valves must meet local plumbing codes and pass tests for quality and safety. These rules protect water supplies in every state. When a plumber installs a float valve in a 6-inch or 8-inch tank, he must check that it carries the right marks, such as UKCA or CE, or meets approved standards. This step ensures the valve will not fail and will keep water safe for everyone.
Choosing a certified float valve protects families and businesses. It also avoids costly repairs and legal trouble.
Backflow happens when water flows the wrong way in a pipe. This can pull dirty water into clean water tanks. Preventing contamination is the main goal of modern float valve design. Part 2 float valves, with their top outlet and air gap, lead the way in backflow prevention. These valves work well in 10-inch and 12-inch tanks, but also fit smaller 2-inch or 4-inch tanks when needed.
The UK regulations demand that every float valve must pass a suck-back or antisiphonage test. This test checks if the valve can stop water from being sucked back into the supply, even during a flood or sudden pressure drop. The air separation section in part 2 valves creates a physical gap between the water supply and the tank water. This simple feature blocks dirty water from entering the clean supply.
Plumbers and building managers trust certified part 2 float valves for water level control and safety. These valves help keep water systems healthy in homes, farms, and factories. They also make it easier to follow the law and avoid fines.
For any water tank—2-inch, 4-inch, 6-inch, 8-inch, 10-inch, or 12-inch—using a certified float valve with strong backflow prevention is the best way to protect water quality.
Picking the right float valve for your water tank means thinking about a few key things. Every tank size, like 2-inch, 4-inch, 6-inch, 8-inch, 10-inch, or 12-inch, has its own needs. The table below shows how Part 1 and Part 2 float valves are different for each factor:
Factor | Part 1 Float Valve | Part 2 Float Valve |
|---|---|---|
Outlet Location | Underside outlet | Top outlet |
Water Level Adjustability | No adjustment; not suitable for irrigation | Adjustable; suitable for irrigation |
Suitable Tank Types | Open-top tanks | Evaporative coolers and tank systems |
Water Pressure Conditions | Not preferred for low pressure | Preferred for low water pressure areas |
Regulatory Compliance | No specific mention | Should be fitted to comply with regulations |
Size | Generally smaller | Generally larger |
Cost | More expensive | Less expensive |
Repairability | Repairable only by replacing packing washer | More versatile and multi-purpose |
Homeowners should look at the tank size first. Small tanks, like 2-inch or 4-inch, need a small valve. Big tanks, like 10-inch or 12-inch, need a bigger, adjustable valve. Water pressure is important too. Part 2 float valves work better if the water pressure is low. If you need to follow plumbing rules, pick a Part 2 valve. Price and how easy it is to fix the valve can help you decide as well.
Tip: Make sure the valve fits your tank size and water pressure. This helps stop leaks and keeps your water system working well.
Putting in a float valve the right way helps control water. You need to use the right size for your tank. Tanks can be 2-inch, 4-inch, 6-inch, 8-inch, 10-inch, or 12-inch. Manufacturers say you should follow steps to install Part 1 and Part 2 float valves. Doing this stops leaks and helps the valve last longer:
Pick the float valve size that fits your tank. Match the valve to the connection size and type. Use the tool joint guide to help.
Check inside the float sub or collar for dirt or things that do not belong. Clean it well so the valve seals do not get hurt.
Put hydraulic oil on the side seals. This makes it easier to move and helps the valve sit right.
Slide the valve into the bore and turn it a little. This makes it easier to put in and keeps the seals safe.
Always put the valve in with the top facing up. This helps it work right in any tank.
Tip: If you use more than one float valve in a system, keep them apart so they do not mess each other up.
Installers sometimes make mistakes. These can cause loud noises, splashing water, or valves that do not close. Common mistakes are picking the wrong pressure, putting the valve in the wrong way, or not cleaning parts. To stop these problems, pick the right valve for the pressure. Hold the valve steady and tighten bolts the same amount. For tanks with lots of waves, like 8-inch or 12-inch, you can add baffles to calm the water.
Taking care of float valves helps them work well. This is true for small 2-inch tanks or big 12-inch tanks. Good care means checking them every day, month, and few months:
Look at float valves every month. Check if the hardware is tight and the float ball is okay. If the float ball is hollow plastic, switch to foam-filled so it does not break.
Check the arms for bends or rust. If parts are bad, use stainless steel to fix them.
Clean the outside of the valve often. Clean the inside once a year if the water is clean, or more if the water is dirty.
Put oil on stems, seals, and ball surfaces. Use what the maker says is best. Oil more often for things like toilet fill valves.
Test how the valve works in different ways. Adjust it if you need to keep water levels right.
Write down when you check, fix, or change parts. This helps you remember what you did.
Lubricating often stops rust and leaks. It also helps the valve work smoothly and last longer.
Teach everyone who works on valves how to do it safely. Use tools like vibration checks or heat cameras to find problems early. Keep extra parts ready so you can fix things fast. If you do these things, your float valves will work well in any tank.
The biggest difference between Part 1 and Part 2 float valves is where water comes out. Part 1 lets water out from the bottom. Part 2 has water come out from the top, which is safer. Part 1 works best in small tanks like 2-inch or 4-inch. Part 2 is better for bigger tanks, such as 6-inch, 8-inch, 10-inch, or 12-inch. Part 2 is also good when you need to follow rules.
Material | Best Use Case |
|---|---|
Brass | Homes, 2/4/6-inch tanks |
Stainless Steel | Factories, 8/10/12-inch tanks |
PVC | Farms, chemical tanks |
Pick a float valve with strong seals and the right material for your tank size. This helps keep water safe and makes sure your system works well every time.
A 6-inch tank works best with a float valve designed for 6-inch systems. This size ensures proper water control and easy installation. Always match the valve size to the tank for the best results.
Most part 2 float valves fit 6-inch, 8-inch, or larger tanks. A 4-inch tank may not have enough space for a part 2 valve. Always check the manufacturer’s size guide before buying.
Outlet location affects water safety and flow. A top outlet, like in part 2 valves, prevents backflow and meets regulations. For 8-inch or 10-inch tanks, this design keeps water clean and safe.
Yes. Stainless steel float valves resist rust and last longer in large 12-inch tanks. They handle high pressure and tough conditions better than brass or plastic options.
Check float valves in 10-inch tanks every month. Regular checks prevent leaks, keep water levels steady, and extend the valve’s life. Maintenance saves money and avoids water damage.
A part 1 float valve offers basic water control but does not stop backflow as well as a part 2 valve. For 8-inch tanks where safety matters, choose a part 2 valve.
A part 2 float valve in a 12-inch tank provides strong backflow prevention and easy adjustment. This keeps water safe and meets modern plumbing codes. It is the best choice for large tanks.


